NIGHTSCAPES – A QUICK GUIDE TO ASTROPHOTOGRAPHY

NIGHTSCAPES INTRODUCTION
Nightscapes is a no frills reference guide to the essentials of photographing the Milky Way. This particular type of photography is known as landscape astrophotography, or “nightscape” photography. Although rather specialized, astrophotography is readily accessible to anyone with a decent digital camera and some basic equipment, like a tripod and a headlamp. While not particularly difficult to learn, there are some basics you need to know to get started. This guide has three parts to help you start making astrophotos. It includes a checklist of the basic planning and equipment you will need, an exposure guide to help you select your aperture, ISO, and shutter speed, and a guide on how to read an exposure histogram and adjust your exposure. Finally, a list of tips will help you make the best of the experience. If you enjoy this guide and are not already part of the Nightscapes online class, you can contact me for video lessons and loads of additional resources. To access the class, visit photographybyko.com/contact and leave me a message. I want to change the way that people look at the world through astrophotography. This simple guide will not only help you start making great photos of the Milky Way, it will help you acquire a new appreciation for the night sky and the beautiful planet that we all share. Donʼt forget to look up, KO.
NIGHTSCAPES PLANNING & EQUIPMENT CHECKLIST

Milky Way at Hooker Lake, Mt. Cook, New Zealand
DARK PLACE
Find a dark location away from city lights. State Parks, National Forests and National Parks all tend to be great places with dark skies. Try the maps on lightpollution.it to find a good location.
DARK NIGHT
Choose a night with clear dark skies between the third and first quarter moon, ideally during a new moon. The Milky Wayʼs bright center is visible around pre-dawn from March to May, midnight from June to August and early evening from September to October. Use Stellarium to predict where to look to see the Milky Way (stellarium.org and stellarium-mobile.org).
DIGITAL SLR
Youʼll need a digital camera with manual controls. The best cameras for astrophotography are full-frame, APS-C, or Micro 4/3 digital SLRs, or mirrorless cameras with interchangeable lenses. Larger sensor cameras allow us to use larger lenses, which allow us to collect more light.
I am using a Canon 5D Mark IV: https://amzn.to/3iTX3PV

Magellanic Clouds above Mt. Fitz Roy, Patagonia, Argentina
FAST WIDE ANGLE LENS
A lens with a focal length of 35mm or less on full-frame cameras, 24mm or less on APS-C cameras, and 16mm or less on Micro 4/3 cameras have wider fields of view and will allow us to use longer shutter speeds. Itʼs recommended that the lens have an aperture f/number of f/2.8 or lower.
I am using a Sigma 14mm F1.8: https://amzn.to/3iSniqc
TRIPOD
Donʼt forget a stable tripod. Make sure that itʼs sturdy enough for your camera but small enough that youʼll be comfortable carrying it around. Tripods with ballheads are easiest to adjust for still photography. Hang a weight from the center column or consider deploying it in a lower position for stability. I am using a Sirui Carbon Tripod: https://amzn.to/377hu6K
HEADLAMP
A headlamp with a a red “night vision” mode is essential for seeing in the dark while preserving your eyesʼ natural night vision. A headlamp is much preferred over a handheld flashlight, because it keeps your hands free to handle your camera in the dark. Headlamp: https://amzn.to/2Vit5wN
ASTROPHOTOGRAPHY EXPOSURE GUIDE
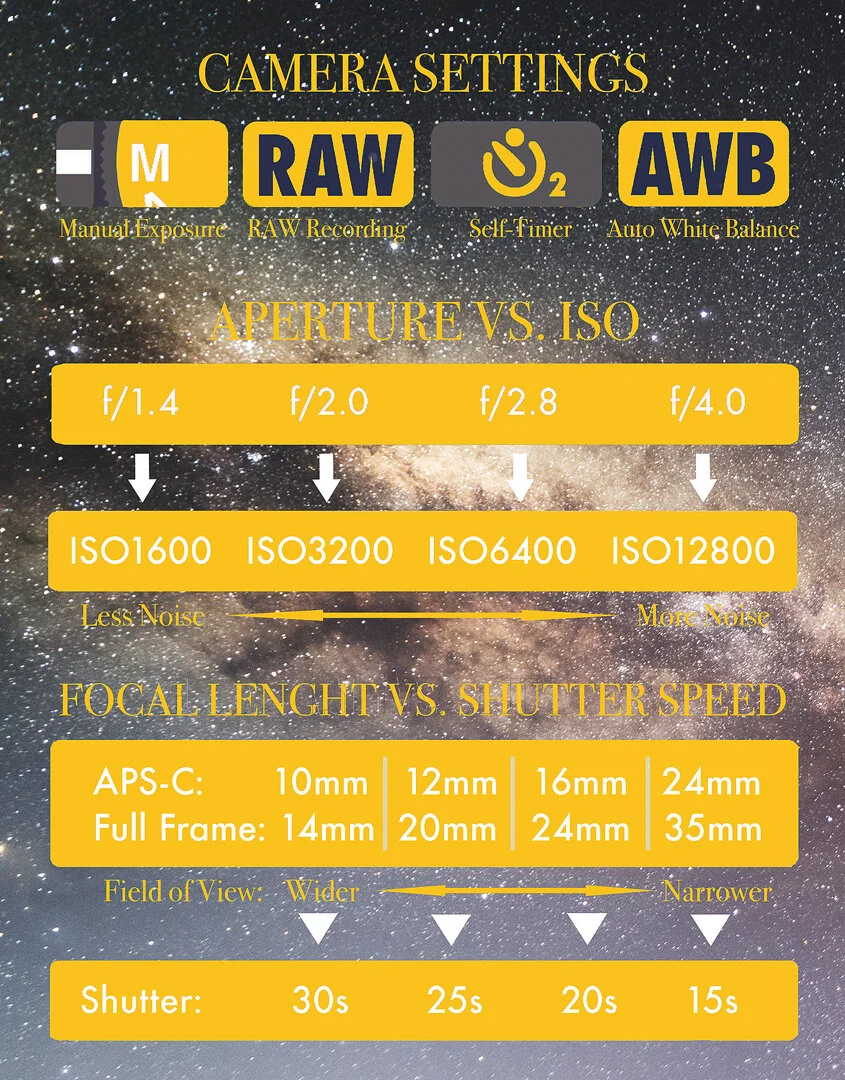
Camera Settings
READING THE EXPOSURE HISTOGRAM
Enable the histogram in your digital camera to allow you to better understand and adjust your astrophotography exposures. The histogram is a plot of the brightness of a photograph. The left edge of the graph represents dark black and the right edge represents bright white.

UNDEREXPOSED
Difficult to recover in post process. Results in overly noisy photographs. Avoid underexposure at all costs. Use a lower f/number, or lengthen the time the shutter is open.

EXPOSED TO THE LEFT
Generally acceptable, most common nightscape exposure with standard settings. Photo may get noisier if pushed in post process. Use a lower f/number or shutter speed if possible.

NEUTRAL EXPOSURE
Safest exposure. Results may appear brighter than natural in the camera but can be easily pulled in post process. No need to change any settings.

EXPOSED TO THE RIGHT
Best choice for the lowest noise but requires care not to overexpose. Results will look overly bright in the camera but can be easily corrected in post process.

OVEREXPOSED
Difficult to recover in post process if highlights are overblown. Rarely occurs unless affected by moonlight or extreme light pollution. Use a lower ISO setting if overexposed.
TIPS
WHERE TO LOOK
The brightest part of the Milky Way can be found near the constellations Sagittarius and Scorpius from February to September. Use a smartphone with a star chart app to help you locate the brightest part of the Milky Way on the night you are shooting. I recommend the Stellarium Mobile app for iOS or Android.
DOUBLE CHECK FOCUS
Double check that your last photos were in focus. It can be very easy to accidentally bump the focus. You wonʼt want to leave for the night with a collection of blurry photos!
FOCUSING AID
If you are having trouble focusing on the stars, try having a friend hold their headlamp or other light source (like a phone screen) at a generous distance from the camera and focus on them instead. You can use autofocus, but live-view and manual focus is preferred. Once focused, carefully switch to manual focus and lock the focusing ring with a piece of gafferʼs tape.
USE HIGH ISO
Donʼt be afraid to use high ISO settings. Astrophotography usually requires you to push the limits of your camera to get the best results. If youʼre worried about noise, remember that you can correct some of it in the computer with post processing.
ENABLE LONG EXPOSURE NOISE REDUCTION
If your photos are coming out overly noisy, check to see if your camera supports long exposure noise reduction. Enabling it should reduce the noise in the exposure but will force you to wait for extra time after each exposure.
USE A LOW F/NUMBER
Itʼs almost always best to pick the lowest aperture f/number your lens will allow to help the lens collect the most light possible. This will result in less noisy photos by allowing you to use lower ISO settings.
So, dear reader, what questions do you have about Astrophotography? Share in the comments! Thanks for reading and sharing!
KO